
Overview
Attacking Identity Systems is an attack vector growing in visibility. Look no further than the Golden SAML tactic [1] used in the SolarWinds campaign. We are seeing an explosion of Cyber Security tools [2, 3], techniques [4, 5], and solid presentations [6] that convey a better understanding of Identity security issues. To build detection and response resiliency, network defenders need a safe lab environment that can mimic real-world scenarios for attacking and defending Identity Systems. PurpleCloud is a Hybrid + Identity Cyber Security Range built for Azure Cloud with automated deployment scripts. It enables a quick and automated method to spin up an Azure Active Directory security lab for a variety of use cases. Use it for an Azure AD penetration testing lab. Cloud security researchers can use it to study adversary tradecraft. In this blog, we’ll do a light introduction to the range by describing one specific use case for Azure Active Directory and reconnaissance using Bloodhound.
Use Cases
PurpleCloud has capabilities well beyond just Azure AD. PurpleCloud includes myriad exciting capabilities for enterprise security testing use cases by simulating an on-premise, hybrid, or cloud-native lab. Some capabilities include:
- Research and penetration testing lab for Azure AD and Azure Domain Services
- Security testing of Hybrid Join and Azure AD Joined devices
- EDR Testing lab
- PoC / Product Security Lab
- Enterprise Active Directory lab with domain joined devices
- Malware / reverse engineering to study artifacts against domain joined devices
- SIEM / Threat Hunting / DFIR / Live Response lab with HELK + Velociraptor
- Log aggregator architecture to forward logs to a cloud native SIEM (Azure Sentinel)
- Data Science research with HELK server, Jupyter notebooks
- Detection Engineering research with Mordor
In this blog we will be focusing specifically on the Azure Active Directory use case. The lab enables simulating privilege escalation within an Azure tenant as well as studying managed identities such as application / service principals with attacks against OAuth 2.0 unauthorized consent grant. The range is a free and open source Infrastructure as Code (IaC) project that uses terraform. What are these terms? A quick primer:
- Infrastructure as Code (IaC) is a technology enabling automated deployment and management of cloud infrastructure using templates or definition files. IaC has a lot of growing use cases for Cyber Security.
- Terraform.io is a company offering both commercial and open source tooling for IaC. With Terraform, we specify definitions in terraform declarative file format and use the terraform free tool to automatically and quickly deploy Azure AD in Azure using the Terraform provider. Terraform has flexible and rich support for all three of the CSPs (AWS, Azure, Google) as well as other providers. Terraform manages the state of the range to automatically build and destroy resources. Magic then happens. Nice.
PurpleCloud Installation for Azure AD Support
Let’s dig into this and build an Azure AD security lab using PurpleCloud’s module for Azure AD. These Terraform modules will automate creation of a lot of nice Azure AD objects that would normally take quite a bit of time to manually build using the Azure portal. They can then be tweaked further for additional capabilities and security research by navigating into the directory and modifying the terraform files: modules/azure_ad. The Azure AD module for Terraform builds the following Azure AD resources mapped into the following files:
- 62 users (users.tf)
- 8 groups (groups.tf)
- 2 applications and 2 service principals (apps.tf)
Let’s get started!
Note: This procedure has been verified on Ubuntu Linux 20.04.
Requirements
- Azure tenant and subscription
- Global Administrator role
- Terraform: Tested on v0.14.7
- Azure CLI tool
Installation Steps
Step 1: Install Terraform on your Linux system as well as the Azure CLI tool.
Download and install Terraform for your platform: https://www.terraform.io/downloads.html
Run this one-liner to install Azure CLI tool on Ubuntu 20.04:
curl -sL https://aka.ms/InstallAzureCLIDeb | sudo bash
Step 2: Set up an Azure Service Principal on your Azure subscription that allows Terraform to automate tasks under your Azure subscription.
Follow the exact instructions in this Microsoft documentation: https://docs.microsoft.com/en-us/azure/developer/terraform/getting-started-cloud-shell
These were the two basic commands that were run based on this link above. First, create a service principal for automated resource creation that will be used by terraform. In the command below, we assign it the Owner role.
az ad sp create-for-rbac --role="Owner" --scopes="/subscriptions/<subscription_id>"
Second, in the step below we will login with that service principal and gather credentials that will be used by the Terraform application.
az login --service-principal -u <service_principal_name> -p "<service_principal_password>" --tenant "<service_principal_tenant>"
Take note of the following which we will use next to configure our Terraform Azure provider:
subscription_id = ""
client_id = ""
client_secret = ""
tenant_id = ""
Step 3: Set up permissions on the Azure Service Principal in your Azure portal account.
Note for Azure AD Module: Azure Active Directory Permission Requirements
To use the Azure Active Directory module with terraform automation, the service principal requires special permissions to read and write Azure AD users, groups, and applications. In my most recent testing both of these permissions described below will be required.
Step #3.1: Assign the “Global Administrator” role to the service principal. To do this within the Azure AD portal, navigate to Azure AD → Roles and administrators. Search for the Global administrator role. Select it and hit the Add Assignments +. On the right side, search for the name of the Azure Service Principal. By default, it will start with “azure-cli-”. Select Add to add the Global administrator role to the Service Principal. After doing this, verify your work. It should look similar to the following:

Step #3.2: Assign the following API permissions to the service principal listed below. The proper screen for API permissions can be accessed by navigating to Azure Active Directory → App Registrations → <Select_App> → API Permissions.
- Azure Active Directory Graph → Application.ReadWrite.All
- Azure Active Directory Graph → Directory.ReadWrite.All
- Microsoft Graph → User.Read
This is what it looks like when set up successfully:

Step 4: Clone the PurpleCloud repo
$ git clone https://github.com/iknowjason/PurpleCloud.git
Step 4: First, copy the terraform.tfexample to terraform.tfvars. Next, using your favorite text editor, edit the terraform.tfvars file for the Azure resource provider matching your Azure Service Principal credentials. These credentials are necessary for the Azure AD provider to use the service principal and create users, groups, and applications with the correct API permissions.
$ cd PurpleCloud\deploy
$ cp terraform.tfexample terraform.tfvars
$ vi terraform.tfvars
Edit these parameters in the terraform.tfvars file, replacing “REPLACE_WITH_YOUR_VALUES” to correctly match your Azure environment.
# Azure RM
arm_client_id = "REPLACE_WITH_YOUR_VALUES"
arm_client_secret = "REPLACE_WITH_YOUR_VALUES"# Azure AD
aad_client_id = "REPLACE_WITH_YOUR_VALUES"
aad_client_secret = "REPLACE_WITH_YOUR_VALUES" # General Subscription and Tenant ID
subscription_id = "REPLACE_WITH_YOUR_VALUES"
tenant_id = "REPLACE_WITH_YOUR_VALUES"
Your terraform.tfvars file should look similar to this below but with your own Azure Service Principal credentials. Note that these are dummy fake values for demonstration purposes and not real account information.
# Azure RM
arm_client_id = "7e3c2cce-8bd4-887d-b2b0-90cd1e7e4781"
arm_client_secret = ":+2$+cdfafdaF-?%:.?d/EYZLK6po9`|E<["# Azure AD
aad_client_id = "7e3c2cce-8bd4-887d-b2b0-90cd1e7e4781"
aad_client_secret = ":+2$+cdfafdaF-?%:.?d/EYZLK6po9`|E<["# General Subscription and Tenant ID
subscription_id = "aa7d8c9f-39c2-6262-89ff-3c78527c1b22"
tenant_id = "8b6917d9-f209-3061-8f4f-dd03332847cb"
Step 5: Uncomment the Azure AD module in main.tf. It is disabled by default. Look for this section block and remove the multi-line comments. It should look like this:
##########################################################
## Azure AD Module - Create Azure AD Users, Groups, and Application
##########################################################
module "azure_ad" {
  source              = "../modules/azure_ad"
  upn_suffix          = local.upn_suffix
  tenant_id           = local.tenant_id
}
Step 6: In main.tf, comment out all of the other modules using /* and */ for multi-line comments. PurpleCloud by default installs a Windows Domain Controller, Windows 10 Endpoint, ELK SIEM Server, as well as an Azure Virtual Network. For this lab, we want to disable all of these infrastructure components so that only Azure AD module is enabled. Comment out the following modules. In terraform the beginning of a multi-line comment is /* and the end of the multi-line comments is */.
- module “network”
- module “dc-vm”
- module “velocihelk”
- module “win10-vm1”
Here is an example of what commenting out the Adversary VM module looks like. The same steps should be done for the other modules to disable them.

Step 7: In main.tf, set the following two variables correctly for Azure AD:
- tenant_id
- upn_suffix (Optional: Only if using custom domain)
The tenant_id variable should be the username associated with your tenant account when it was setup and it forms the universal principal name (UPN) suffix for your AD users. Let’s say your username is acmecorp. Then the upn suffix will be acmecorp.onmicrosoft.com. If you have added a custom domain to Azure, then you can use that custom domain as your upn suffix instead of ‘tenant_id.onmicrosoft.com’. The following screenshot shows a sandbox configuration for tenant_id:

Step 8: Run the commands to initialize terraform and apply the resource plan
$ cd PurpleCloud/deploy
$ terraform init
$ terraform apply -auto-approve
This should start the Terraform automated deployment plan and you should see the resource plan create. If for any reason you receive an error, run the terraform apply a second time. At the end of this, you will see the following:

Step 9: Get the Azure AD user password. The following file contains a dynamically generated password created by terraform for each run of the lab. The file is located here:
modules/azure_ad/AAD_PASSWORD.txt
This is the password set for all 62 Azure AD users.
Step 10: Verify your work in https://portal.azure.com
Verify Azure users created in Azure Active Directory → Users

Verify Azure groups created in Azure Active Directory → Groups

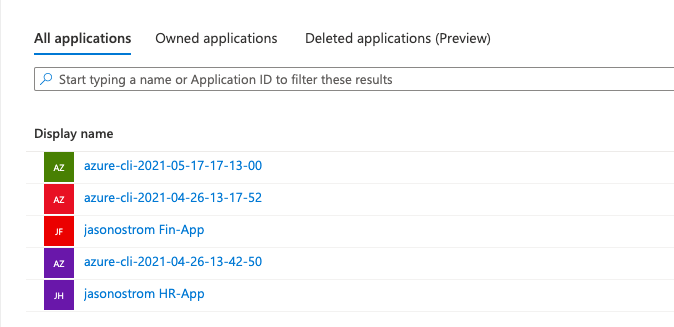
Verify applications created in Azure Active Directory → App Registrations. You should see one ending in HR-App and one ending in Fin-App.
Azure AD Reconnaissance using Bloodhound
BloodHound is an effective and valuable reconnaissance tool for penetration testing. It provides great visibility into mapping attack pathways, lateral movement, and privilege escalation in a very nice visual UI backed by a Neo4j graph database. Andy Robbins and the other BloodHound authors recently added Azure Object support and data ingestion with the AzureHound collector [7]. What does this mean for us? Now we can effectively look at attack pathways of privilege escalation within an Azure tenant, pathways from on-premise AD into Azure, and attacks from above in moving from Azure into on-premise AD environments [8].
Let’s quickly walk through the data ingestion and import into Bloodhound using the new AzureHound collector.
Step 1: On a Windows 10 Pro system, download the AzureHound data collector powershell scripts from https://github.com/BloodHoundAD/AzureHound
Step 2: Launch a powershell session with Administrator privileges:
powershell -exec bypass
Step 3: Install the Az module and select A when prompted:
Install-Module -name Az -AllowClobber

Step 4: Install the AzureAdPreview module and select A when prompted:
Install-Module -name AzureAdPreview -AllowClobber
Step 5: Run the two following cmdlets to authenticate to Azure and Azure AD powershell for data collection. For this safe lab PoC, I recommend using your Global Administrator account for these cmdlets. It permits visibility to see more objects at the tenant level such as subscriptions.
Connect-AzureAD
Connect-AzAccount
Step 6: Extract the AzureHound zip file and import the module from the download and extraction directory.
Import-Module C:\Users\Username\Downloads\AzureHound-master\AzureHound-master\AzureHound.ps1
Step 7: Run Invoke-AzureHound from the previous directory and see the data collected!
Invoke-AzureHound
You should see it collects all of the Azure objects in the tenant and packs it into a zip file. This zip file can then be copied to the system running the BloodHound binary!


Step 8: Copy the zip file to your BloodHound system and Upload the Data from the zip file. This article assumes that you have already installed Bloodhound and are familiar with it. For further information follow the BloodHound docs:
Step 9: Visualize the data. Navigate to the top search and type aztenant:
Select the tenant. From this view you can see the Azure user and group objects and other Descendant Objects.

Destroy the PurpleCloud AzureAD Resources
When it’s time to destroy the lab resources, Terraform can automatically facilitate this. Just navigate into the same directory where you launched terraform apply:
$ cd PurpleCloud/deploy
$ terraform destroy -auto-approve

Conclusion
This is an R&D framework tool to use for security research and building new tools on top of. I plan to expand upon it with workshops, exercises, and other tools for Azure AD security. Feedback and suggestions are welcome.
References
[2] https://github.com/AlteredSecurity/365-Stealer
[4] https://www.slideshare.net/DouglasBienstock/troopers-19-i-am-ad-fs-and-so-can-you
[6] https://www.youtube.com/watch?v=mxOHcqHxpi8
[7] https://www.youtube.com/watch?v=gAConW5P5uU
[8] https://posts.specterops.io/death-from-above-lateral-movement-from-azure-to-on-prem-ad-d18cb3959d4d